Before posting the Sales Transaction, users should print out the Edit List report for final checking and verification.
1. To print Sales Transaction Entry Edit List, go to:-
Path: Transaction > Sales > Sales Batches
2. Select the batch that need to post from <Batch ID>, and then select [Print] to generate the Edit List Report.

3. In the Sales Document Print Options, select “Edit List” from <Form to Print>. Then select [Print].

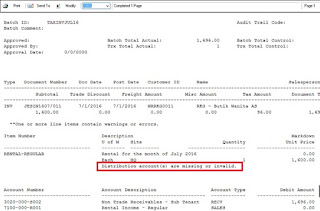
4. In the Edit List report, if there is error in the transaction, it will be able to identify and provide the error message that shows you what is the actual error. Refer to the error identify below, the error indicates there are missing account code from the distribution entry.
5. To amend the error, go to the problem transaction in Sales Transaction Entry. Next, select the item in <Line Items by Order Entered>, then select Item Detail which is the Blue Arrow.

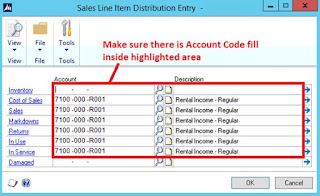
6. Then select [Distribution] in Sales Item Detail Entry screen.

7. You will notice there are empty field in the highlighted area. Make sure there is account code in each of the highlighted area. It doesn't matter what account code it is, system needs a default account code to be present here (provided the transaction is not dealing with Inventory). Once all the field is fill up with account code, select [OK].
8. Select [Save], select [Yes] when you see the following pop up message. Then continue to save the transaction and print out edit list to check again before posting.

1. To print Sales Transaction Entry Edit List, go to:-
Path: Transaction > Sales > Sales Batches
2. Select the batch that need to post from <Batch ID>, and then select [Print] to generate the Edit List Report.

3. In the Sales Document Print Options, select “Edit List” from <Form to Print>. Then select [Print].

4. In the Edit List report, if there is error in the transaction, it will be able to identify and provide the error message that shows you what is the actual error. Refer to the error identify below, the error indicates there are missing account code from the distribution entry.

5. To amend the error, go to the problem transaction in Sales Transaction Entry. Next, select the item in <Line Items by Order Entered>, then select Item Detail which is the Blue Arrow.

6. Then select [Distribution] in Sales Item Detail Entry screen.

7. You will notice there are empty field in the highlighted area. Make sure there is account code in each of the highlighted area. It doesn't matter what account code it is, system needs a default account code to be present here (provided the transaction is not dealing with Inventory). Once all the field is fill up with account code, select [OK].

8. Select [Save], select [Yes] when you see the following pop up message. Then continue to save the transaction and print out edit list to check again before posting.

Comments
Post a Comment