Currency ID in Dynamics GP doesn't come in default, it need to be setup and configured. Please follow the guided steps below:-
Path: MSDGP > Tools > Setup > System > Currency
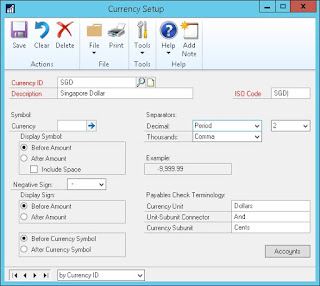
1. Enter the new currency information in Currency Setup. Refer to sample below on creating new currency "SGD" Singapore Dollar. You can enter the currency symbol in "Symbol Currency" if you need the currency to show next to the amount in GP Windows and Reports. For Example, if the currency ID you're setting up is Singapore dollar, you would enter "SGD" as the currency symbol. This currency symbol will be showing in Smartlist too even you export to Excel.
2. Set up exchange rate tables, specify the source for the exchange rates in the tables and select how often you want to update the exchange rate tables.
Path: MSDGP > Tools > Setup > System > Exchange Table
3. Enter an exchange rate table ID and description. Normally I will named the exchange table ID by putting the functional currency at first, then follow by foreign currency and type of exchange rate. Refer to screenshot below, the functional currency for this entity is "MYR", and the exchange table that need to setup is "SGD" for Average rate, therefor I named it "MYR/SGD-AVE".

4. Select a rate frequency to indicate how often you plan to enter rates for the selected exchange rate table.
5. Select a rate calculation method, either Multiply or Divide. Once you’ve selected a calculation method for the exchange rate table, it can’t be changed.
6. Select a Transaction Rate Default option to determine the exchange rate that will be used when multicurrency transactions are entered. Each time you enter a transaction, a currency must be selected. If there isn’t an exchange rate for the transaction date, the option selected here will be used to select the exchange rate. Normally I will select "Previous Date" as the default exchange rate to be the rate for the closest previous date, if no rate exists for the transaction date. If an exchange rate exists for the transaction date, that rate will be used as the default exchange rate.
7. Select [Save].
8. You may select the access on which entity will able to use the new currency ID and Exchange Table ID.
Path: MSDGP > Tools > Setup > System > Multicurrency Access Setup

9. After the currency access is granted, you need further configure the Exchange Rate Type on which table to use. User just need to select the rate types that Exchange Table ID will use.
Path: MSDGP > Tools > Setup > Financial > Rate Types

10. After the setup and configuration of currency ID and exchange table ID are done, user can now enter the conversion rate in table that setup previously.
Path: Cards > System > Exchange Table

***After new currency is setup, user will need to use the Select Account Currencies window to assign currencies access to the accounts code for transaction posting. Refer to the link below on how to assign currency to account code.
"This Currency ID hasn't been selected for use with this account"
Path: MSDGP > Tools > Setup > System > Currency
1. Enter the new currency information in Currency Setup. Refer to sample below on creating new currency "SGD" Singapore Dollar. You can enter the currency symbol in "Symbol Currency" if you need the currency to show next to the amount in GP Windows and Reports. For Example, if the currency ID you're setting up is Singapore dollar, you would enter "SGD" as the currency symbol. This currency symbol will be showing in Smartlist too even you export to Excel.

2. Set up exchange rate tables, specify the source for the exchange rates in the tables and select how often you want to update the exchange rate tables.
Path: MSDGP > Tools > Setup > System > Exchange Table
3. Enter an exchange rate table ID and description. Normally I will named the exchange table ID by putting the functional currency at first, then follow by foreign currency and type of exchange rate. Refer to screenshot below, the functional currency for this entity is "MYR", and the exchange table that need to setup is "SGD" for Average rate, therefor I named it "MYR/SGD-AVE".

4. Select a rate frequency to indicate how often you plan to enter rates for the selected exchange rate table.
5. Select a rate calculation method, either Multiply or Divide. Once you’ve selected a calculation method for the exchange rate table, it can’t be changed.
6. Select a Transaction Rate Default option to determine the exchange rate that will be used when multicurrency transactions are entered. Each time you enter a transaction, a currency must be selected. If there isn’t an exchange rate for the transaction date, the option selected here will be used to select the exchange rate. Normally I will select "Previous Date" as the default exchange rate to be the rate for the closest previous date, if no rate exists for the transaction date. If an exchange rate exists for the transaction date, that rate will be used as the default exchange rate.
7. Select [Save].
8. You may select the access on which entity will able to use the new currency ID and Exchange Table ID.
Path: MSDGP > Tools > Setup > System > Multicurrency Access Setup

9. After the currency access is granted, you need further configure the Exchange Rate Type on which table to use. User just need to select the rate types that Exchange Table ID will use.
Path: MSDGP > Tools > Setup > Financial > Rate Types

10. After the setup and configuration of currency ID and exchange table ID are done, user can now enter the conversion rate in table that setup previously.
Path: Cards > System > Exchange Table

***After new currency is setup, user will need to use the Select Account Currencies window to assign currencies access to the accounts code for transaction posting. Refer to the link below on how to assign currency to account code.
"This Currency ID hasn't been selected for use with this account"
Comments
Post a Comment